The Level IO Blog

Guides, Tips &
Setup Inspiration

Real advice from people who've obsessed over gaming rooms so you don't have to start from scratch.

Latest Articles

From the Studio

Click "Read Article" on any card below to expand the full guide inline.

PC Gaming Room Design
Setup Guide
April 2026 · 6 min read

How to Design the Perfect PC Gaming Room: A Complete Guide

From monitor placement to acoustic panels — everything you need to know before you build your dream battlestation room. We break it down step by step.

Read Article

A great gaming room isn't just about having the best hardware — it's about designing a space where every element works together to support long, comfortable, and immersive sessions. Whether you're building from scratch or overhauling an existing setup, these are the fundamentals you need to get right.

Start with Ergonomics

Before you buy a single RGB strip, think about your body. The single biggest return on investment in any gaming room is a proper ergonomic setup. Your monitor should sit at eye level, roughly 50–70 cm from your face. Your chair should support your lower back, and your elbows should rest at roughly 90 degrees when your hands are on the keyboard. Most gamers get this wrong and pay for it with neck and wrist pain years later. Invest in an adjustable monitor arm and a quality ergonomic chair — it will outlast every peripheral you own.

Monitor Placement and Viewing Angles

For a single monitor, centre it directly in front of you. For dual monitors, angle each screen inward at roughly 15–20 degrees so your neck stays neutral when switching. If you're going ultrawide, position it closer to compensate for the wider field of view. Triple monitor setups need precise symmetry — a millimetre off creates visible distortion at the bezels. Use a sturdy, rated monitor arm rather than a cheap stand; monitors are heavy and desk mounts are safer long term.

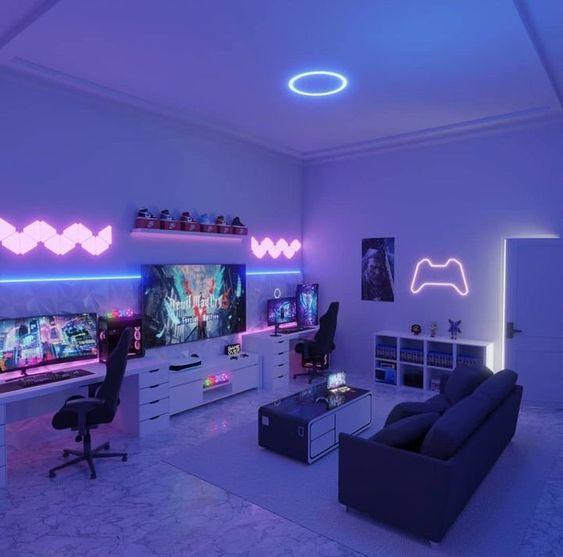
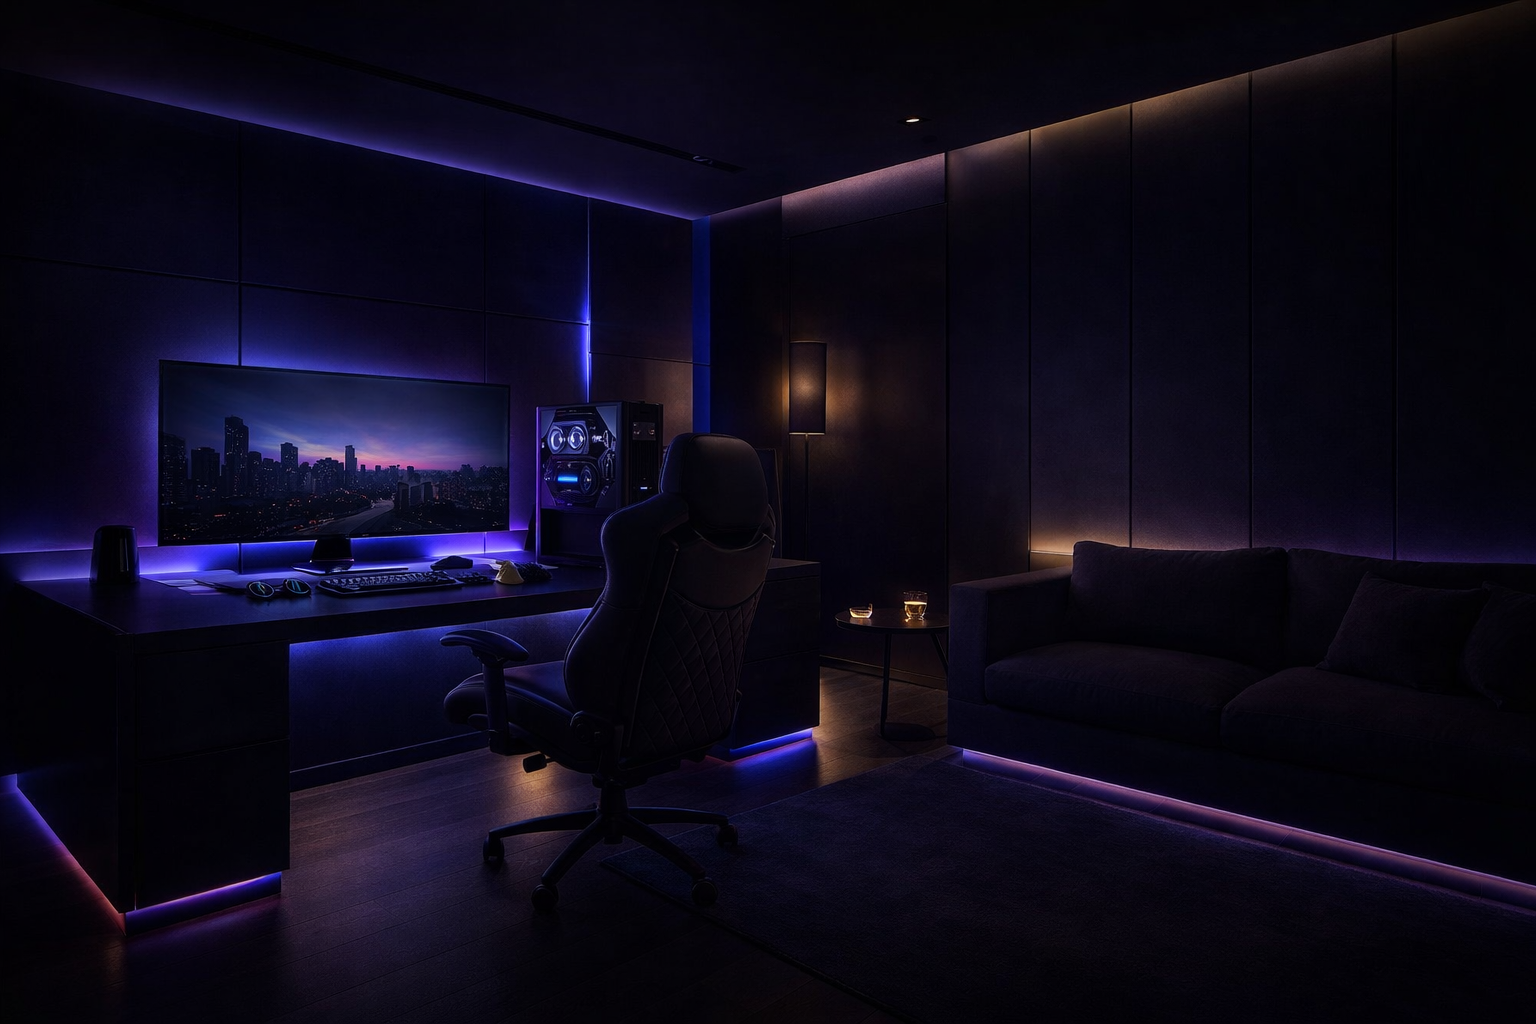
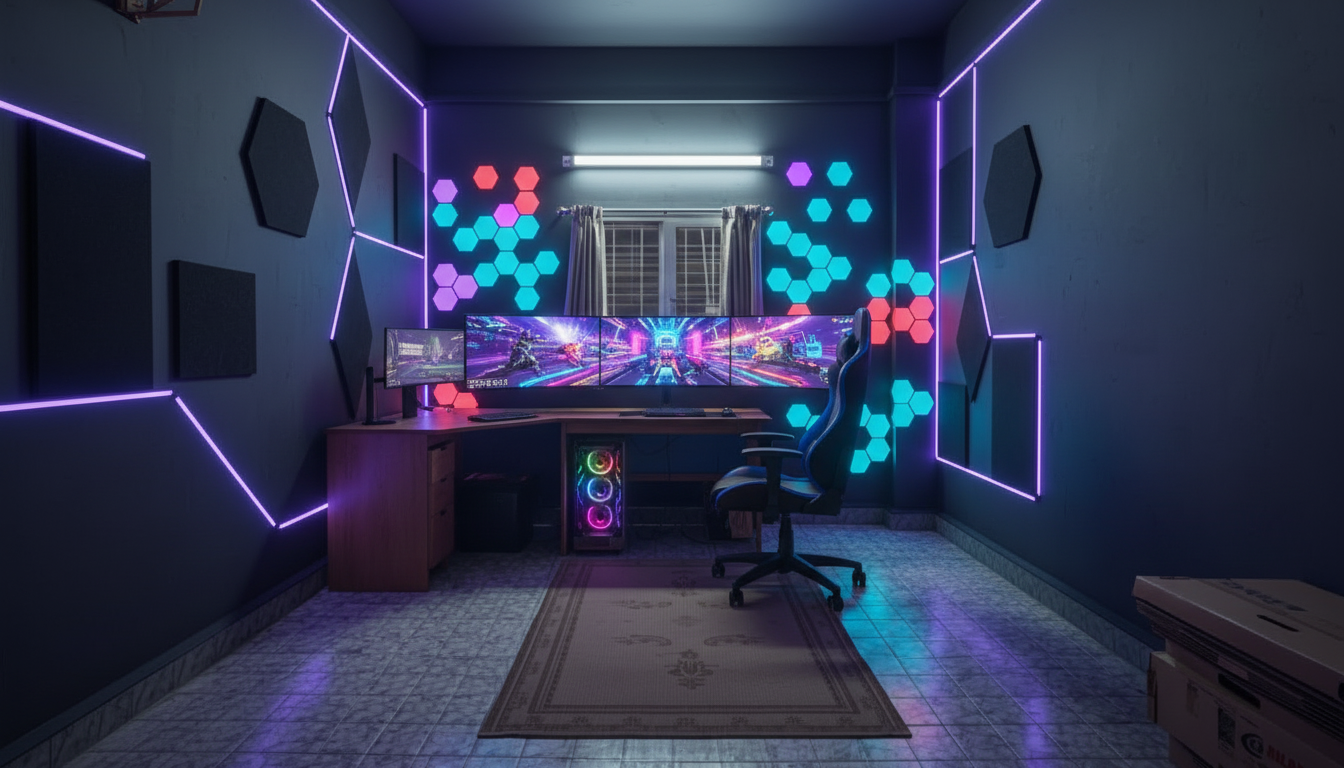
Lighting: Layers, Not Just RGB

Good lighting in a gaming room works in three layers: ambient, task, and accent. Ambient lighting controls the room's overall brightness. Task lighting ensures you can see your keyboard and desk surface without straining. Accent lighting — your RGB strips, LED panels — creates the atmosphere. Avoid gaming in a completely dark room with a bright monitor; the contrast causes eye fatigue. Install bias lighting (a LED strip behind your monitor) to reduce that contrast and add depth to your setup.

Acoustic Treatment

Hard walls, bare floors, and flat ceilings create echo and reverb that make voice chat muddy and gaming audio less precise. Acoustic foam panels on the walls behind your desk and in the corners of the room dramatically reduce this. You don't need to treat the whole room — targeting early reflections (the surfaces sound hits first after leaving your speakers) gives you 80% of the result with 20% of the effort. Bookshelves filled with books and a thick rug also absorb sound naturally without looking clinical.

Cable Management

Nothing ruins a beautiful setup like cable spaghetti. Plan your cable routes before you place any furniture. Use cable raceways along the wall edges, velcro ties to bundle cables running the same direction, and a cable management tray under the desk to hide power strips and excess cable length. Label your cables at both ends so you're never guessing which HDMI goes where. Wireless peripherals (keyboard, mouse, headset) reduce desk clutter significantly — consider making the switch if you haven't already.

Flooring and Room Acoustics

Hard flooring reflects sound; carpet absorbs it. If you're on hard flooring, a large gaming mat or area rug under your desk zone solves both the acoustic and the aesthetic problem. For room builds, vinyl plank flooring is a popular choice — durable, easy to clean, and available in styles that complement dark gaming room aesthetics beautifully.

Getting all of these elements right simultaneously is exactly what Level IO Studios does for every client. If you'd like help designing your space, start a free consultation here.

RGB Gaming Room Lighting
Lighting
April 2026 · 5 min read

RGB Lighting 101: How to Light Your Gaming Room Like a Pro

LED strips, bias lighting, colour temperature, smart sync systems — here's everything you need to know to light your gaming space the right way without turning it into a disco.

Read Article

Lighting is arguably the most visible element of any gaming room — it's what makes your setup look extraordinary in photos and feel immersive in person. But most gamers approach it backwards: they buy a bunch of RGB products and wonder why the room doesn't look as good as the setups they see online. The difference is intentional design.

Understand Colour Temperature First

Before you pick an RGB colour, understand that the base lighting in your room matters just as much. Colour temperature is measured in Kelvin: warm light (2700K–3000K) creates a cosy, amber glow; cool light (5000K–6500K) is bright and clinical. Most gaming rooms look best with a neutral to slightly cool ambient temperature (4000K–5000K) combined with RGB accent colours in the blue, purple, or cyan range. The contrast between the neutral ambient and the coloured accents is what creates that signature gaming room look.

LED Strips: Placement is Everything

LED strips are the most versatile tool in your lighting kit, but placement is where most people go wrong. The key rule: hide the strip, show the light. Mount strips behind your desk, inside desk edges, along ceiling coves, behind your monitor, and under furniture — anywhere the strip itself is hidden but the light bleeds onto a surface. Visible LED strips look cheap; diffused LED glow looks premium. Use an aluminium LED channel with a frosted diffuser cover to spread the light evenly and eliminate hot spots.

Bias Lighting — The Underrated Essential

Bias lighting refers to the LED strip mounted directly behind your monitor or TV. It serves two purposes: it reduces the perceived contrast between your bright screen and the dark room behind it (reducing eye strain), and it creates a beautiful halo effect that makes even a modest setup look intentional. Use a warm-neutral white for eye health, or match it to your RGB colour scheme for full aesthetics. Products like Govee or Corsair iCUE Lighting Strips work well for this.

RGB Sync: When to Use It

RGB sync software (Corsair iCUE, ASUS Aura Sync, Razer Chroma) lets your peripherals, PC components, and some LED strips all change colour together. It looks impressive but has limitations: sync software from different brands rarely talks to each other, and managing multiple ecosystems becomes a headache. Our advice: pick one ecosystem and commit. If you're going Corsair keyboard and mouse, go Corsair for your fans and case lighting too. Mixing is a recipe for hours of frustration.

Smart Lighting Integration

Smart bulbs and smart LED strips (Philips Hue, Govee, LIFX) let you control your entire room lighting from an app, voice command, or even your game. Some games (like Razer's Chroma integration) can sync room lighting to in-game events — your screen flashes red when you take damage, for example. For a truly immersive setup, smart lighting is the layer that ties everything together. Set scenes for different activities: a bright, neutral scene for creative work; a dim, blue-tinted scene for late-night gaming; a full-colour party mode for streams.

Ambient vs Task Lighting

Never rely solely on RGB for visibility. You still need task lighting — a small LED desk lamp positioned to illuminate your desk surface without creating glare on your screens. Place it to the side and slightly behind your line of sight. This ensures your eyes aren't straining to read notes or adjust settings in the dark, while your RGB accents handle the aesthetics. Balance is the goal: your room should be lit well enough to function, and atmospheric enough to feel like a gaming space.

At Level IO Studios, lighting design is one of the first things we plan for every build — because it transforms how the entire room feels. Book a free consultation and we'll design a lighting plan specific to your space.

Gaming Cafe vs Home Setup
Business & Personal
April 2026 · 7 min read

Gaming Cafe vs Home Gaming Room: What's Worth the Investment?

Thinking about opening a gaming cafe — or upgrading your home setup instead? We break down the costs, use cases, and ROI so you can make the right call for your situation.

Read Article

Two very different dreams, two very different investment profiles. Whether you're a gamer eyeing the perfect home sanctuary or an entrepreneur seeing opportunity in India's booming gaming market, the decision between a home gaming room and a commercial gaming cafe deserves serious analysis. Here's how they stack up.

The Home Gaming Room: Personal Sanctuary

A home gaming room is a personal investment in your quality of life. Done well, it increases property value, eliminates the cost of gaming cafes over time, and creates a space that's entirely yours — no booking required, no time limits, no other people's snack smells. Budget-wise, a solid home gaming room in India ranges from ₹1.5 lakh (a focused battlestation with good lighting and cable management) to ₹10 lakh and beyond (a full room transformation with acoustic treatment, custom furniture, and a premium PC). The ROI is personal: better focus, better performance, less money spent outside the home on gaming sessions.

The Gaming Cafe: Commercial Opportunity

A gaming cafe is a business, and it should be evaluated like one. The Indian gaming cafe market is growing rapidly, driven by mobile gaming spillover into PC gaming, esports popularity, and the social dimension of gaming. A well-designed gaming cafe in a tier-1 Indian city can generate ₹1–3 lakh per month in revenue with 20–30 stations at ₹40–80/hour. Initial investment typically runs ₹20–60 lakh for a fully equipped, professionally designed space — that includes hardware, furniture, network infrastructure, interior design, licensing, and working capital.

Break-Even Analysis

Most gaming cafes in India break even within 18–36 months if they're in the right location and managed correctly. Key variables: footfall (location is everything), average session length, pricing strategy, and operating costs (rent dominates). Cafes that add food and beverage revenue, esports tournament hosting, or membership programmes significantly improve their economics. The mistake most cafe owners make is underinvesting in design — a premium-looking space commands premium prices and attracts a loyal customer base.

Use Cases: Home vs Cafe

Choose a home gaming room if you game daily, value privacy and customisation, work from home and need a focused environment, or create content regularly. Choose a gaming cafe business if you want an income-generating venture, have access to a good commercial location, understand hospitality and customer service, and are prepared for the operational demands of running a small business. The two aren't mutually exclusive — some of our clients are cafe owners who also want a premium home setup.

Design Differences

Home gaming rooms prioritise personal aesthetic and individual ergonomics. Commercial setups prioritise durability, ease of cleaning, standardised station layouts for efficiency, and an atmosphere that draws people in and keeps them coming back. Commercial furniture needs to survive hundreds of hours of use per month; home furniture can prioritise comfort over pure resilience. Lighting in cafes is theatrical — it creates the mood from the moment someone walks through the door. In a home room, it can be more subtle and personal.

Our Take

If you're primarily a gamer, build the home room. If you're an entrepreneur with a passion for gaming, the cafe model in India right now has genuine upside — but only if you invest in quality design and a good location. A poorly designed cafe is just a room with computers. A well-designed one is a destination. Level IO Studios builds both. Talk to us about which path makes sense for you.

Cable Management Gaming Setup
Cable Management
April 2026 · 5 min read

Cable Management Tips That Will Transform Your Gaming Setup

Cable management is the single most underrated upgrade you can make to any setup. Here's how to go from wire chaos to a clean, professional-looking desk — without spending a fortune.

Read Article

Ask any experienced setup builder what separates an amateur build from a professional one, and most will say the same thing: cable management. It's the invisible element that makes everything look intentional. Great cable management doesn't just look better — it makes your setup easier to maintain, reduces fire risk, and prevents the slow creep of cable chaos that eventually makes your desk unusable. Here's how to do it right.

Plan Before You Place

The biggest cable management mistake is trying to manage cables after everything is already positioned. Before you place your monitors, desk, and PC, sketch out where cables will need to run and how you'll route them. Which way does your power strip face? Where are your wall outlets relative to your desk? Will you route cables along the wall or through the desk? Answering these questions upfront saves hours of rework later.

Cable Raceways and Channels

Cable raceways are plastic or aluminium channels that mount to walls or desks and hide cables inside them. They're inexpensive and transform the appearance of your setup dramatically. Run them along the back edge of your desk, down the desk leg, and along the skirting board to the wall outlet. White raceways blend with white walls; black ones work with dark setups. For a cleaner look, paint them to match the wall — they become nearly invisible. Self-adhesive raceways are easy to install without drilling.

Velcro Ties: Buy a Bag, Use Generously

Velcro cable ties are the workhorse of cable management. Unlike zip ties (which are permanent and require cutting to adjust), velcro ties are reusable and adjustable. Use them to bundle cables that run in the same direction, secure excess cable length in neat loops, and attach cable runs to the underside of your desk. Buy a pack of 100 — they cost almost nothing and you'll use every one.

Under-Desk Cable Management

The underside of your desk is prime real estate for hiding cables and power strips. A cable management tray (a mesh or metal basket that mounts to the underside of the desk) keeps your power strip, cable bundles, and excess lengths completely out of sight. Combined with velcro ties, you can route every cable from your PC, monitors, and peripherals cleanly into this tray and then down a single bundled run to the wall. From the front, your desk looks like it has no cables at all.

Desk Grommets for Through-Desk Routing

If your desk has or can accommodate a grommet hole (a circular opening with a plastic or rubber cap), use it to route cables straight through the desk surface. This eliminates the need for cables to travel around the desk edge and creates a much cleaner look. Many gaming desks come with grommets built in; if yours doesn't, a 60mm grommet kit and a spade bit is an inexpensive weekend project.

Go Wireless Where It Makes Sense

Modern wireless peripherals have eliminated the latency disadvantage that once made them unsuitable for competitive gaming. A wireless keyboard and mouse eliminates the two most visible cables on your desk. A wireless headset or quality Bluetooth headphones removes the headset cable from your setup entirely. These changes alone can reduce your visible cable count by 50%. For a competitive player, a wired mouse is still preferable for zero-latency input — but for most gamers, wireless is now excellent.

Label Everything

This tip pays dividends whenever you need to make changes. Label both ends of every cable — "Monitor 1 HDMI", "PC Power", "Desk USB Hub" — with a label maker or even adhesive labels. When you need to swap a monitor or troubleshoot a connection six months later, you'll be grateful for ten minutes of labelling work you did today.

At Level IO Studios, cable management isn't an afterthought — it's engineered into every build from day one. Get in touch if you want a setup that looks as good behind the desk as it does in front of it.

Future-Proof Gaming Room
Future-Proofing
April 2026 · 6 min read

How to Future-Proof Your Gaming Room: Build for Tomorrow, Not Just Today

Gaming tech moves fast. Here's how to design a room that evolves with your hardware — so you're never tearing everything apart to accommodate next year's upgrade.

Read Article

The worst feeling in any gaming room build is completing it, enjoying it for 18 months, and then realising your next hardware upgrade requires you to tear half of it apart. Future-proofing isn't about predicting the future — it's about building flexibility into your setup so upgrades slot in cleanly rather than creating chaos. Here's how to think about it.

Modular Furniture: Flexibility Over Aesthetics

Fixed, custom-built desks look incredible but they're unforgiving when your setup changes. A 1.8m monitor with a single-arm mount becomes a problem the moment you want to add a second screen. Modular desk systems — where you can add extension sections, change desk heights, or reposition cable management elements — give you room to grow. Look for desks with integrated cable grommets, adjustable legs (sit-stand functionality is increasingly valuable for long sessions), and standardised monitor arm mounting options. Think of your desk as infrastructure, not decoration.

Run Extra Cables Now

One of the most impactful and least expensive future-proofing moves is to run extra cables through your walls and furniture now, while everything is accessible. Run an additional HDMI 2.1 cable alongside your current display runs. Run an extra Cat 6A ethernet cable to your desk even if you're currently on Wi-Fi. Add an additional power run to the desk area. Cables hidden inside walls and furniture channels are essentially free once the work is done — but pulling new cables later, after wall panels are up and cable raceways are sealed, is a real project. Think of it as leaving yourself an upgrade path.

PCIe 5.0 and Storage Readiness

If you're building or buying a new PC, make sure your motherboard has PCIe 5.0 slots for your primary NVMe drive and GPU. PCIe 5.0 SSDs are now mainstream, offering speeds exceeding 10,000 MB/s — a massive jump that will matter increasingly as game file sizes grow and game engines begin streaming assets in real time rather than loading them ahead of time. Having PCIe 5.0 ready means your storage infrastructure is solid for the next 4–5 years at minimum.

WiFi 6E and Network Infrastructure

Gaming rooms live or die on network performance. Wi-Fi 6E (6 GHz band) offers significantly lower interference and faster speeds than Wi-Fi 5 or Wi-Fi 6 — essential if you're gaming wirelessly or if other devices in the house compete for bandwidth. Even better: run a wired ethernet connection to your desk now. Cat 6A supports 10 Gbps and is more than adequate for any foreseeable consumer internet connection. Future ISP upgrades won't require touching your internal wiring. A small network switch at your desk also lets you wire up your PC, console, streaming device, and smart TV simultaneously.

Display Technology: 4K, 8K, and High Refresh Rates

If you're buying a monitor today, buy for tomorrow. 1440p 165Hz is the current sweet spot for competitive gaming, but 4K 144Hz monitors are now affordable enough that they represent an excellent long-term purchase. 8K gaming is still years away from mainstream viability — GPUs powerful enough to drive it at high refresh rates don't exist for consumers yet. But the display mounts, cables, and infrastructure you put in now should accommodate a 4K display; make sure your video cards are outputting HDMI 2.1 or DisplayPort 2.0 rather than older standards that cap at 4K 60Hz.

Upgradeability: The Build Philosophy

The best future-proofing mindset is to avoid over-engineering one component at the expense of flexibility everywhere else. Don't spend your entire budget on a fixed custom desk that can never be reconfigured — spend a bit less on the desk and more on a quality cable management system that makes future rerouting painless. Don't hardwire your LED lighting in a way that can't be changed — use addressable LED strips with standardised connectors so you can extend or replace sections. Build with tools, not with glue.

Plan for the Next Generation

Gaming rooms that age well are designed around principles, not products. The product changes; the principle remains. Good ergonomics will still be important in 10 years. Proper cable management will still matter. Acoustic treatment doesn't go obsolete. Invest heavily in these timeless elements, and budget conservatively for the specific products that will be replaced in two to three upgrade cycles anyway.

At Level IO Studios, we design every build with an eye on what our clients' setups will look like in five years, not just at handoff. Start the conversation and let's build something that grows with you.

Ready to Build?

Put the Guides into Practice.
Let Us Build It For You.

Free consultation, no pressure. Tell us about your space and we'll design something extraordinary.